Thursday, July 29, 2010
Steps to install Loadrunner 9.5 SP2 patch
Pre-requisite
- Extract the LR9.5 SP2 zip to local diskGo the following directory in the windows explorer "rootdirectory\LR_03012
- "Double click "LoadRunner_952" application
- Click "Install" button after reading the instruction
- Be patient till "Welcome to the LoadRunner 9.52 Setup Wizard" appears
- Click "Next" button
- Click "Next" button in "Confirmation Section"
- "Installing Loadrunner 9.52" section shows the progress of installation
- Click "Finish" button in "Finish section"
- Double click Vugen desktop shortcut
- Go to Help Menu and click "About HP Virtual User Generator" item (Product version is displayed)
- Click "Details..." button to get more details.
Find below the installation screenshot for referrence.

Steps to install Loadrunner 9.5 SP1 patch
Pre-requisite
Download-loadrunner-951-sp1-patch
Download-loadrunner-951-sp1-patch
- Extract the LR9.5 SP1 zip to local disk
- Go the following directory in the windows explorer "rootdirectory\LR_03009"
- Double click "LoadRunner_951" windows installer patch
- Be patient till "Welcome to the LoadRunner 9.51 Setup Wizard" appears
- Click "Next" button
- Click "Next" button in "Confirmation Section"
- "Installing Loadrunner 9.51" section shows the progress of installation
- Click "Finish" button in "Finish section"
- Double click Vugen desktop shortcut
- Go to Help Menu and click "About HP Virtual User Generator" item (Product version is displayed)
- Click "Details..." button to get more details.
Find below the installation screenshot for referrence.

Sunday, July 25, 2010
Vugen Recording - Web Tours New User Registration
Pre-Requisite
setting-up-recording-options-before-recording
Steps To Record
setting-up-recording-options-before-recording
Steps To Record
- Double click “Vugen” desktop shortcut
- Click File > New
- In New Virtual User Dialog window, Select Web(HTT P/HTML) if it is not selected default
- Click Create button
- In Start Recording Dialog window, Enter http://127.0.0.1:1080/WebTours if it is not displayed default
- Click ok button
- Web Tours welcome page is opened in the Internet Explorer.
- In Vugen Recording toolbar, Click “Insert Comment” (3rd from right)menu item
- In Insert Comment dialog window, Enter comment as “Click sign up now link” and click “ok” button.
- Click “sign up now “ link in Web Tours welcome page
- In Customer Profile page, complete the form by entering the following values.
- For simplicity, enter value as “staytuned1” for all the text field values.
- In Vugen Recording toolbar, Click “Insert Comment” menu item
- In Insert Comment dialog window, Enter comment as “Click Continue… button” and click “ok” button.
- Click “Continue… “ button in Web Tours application.
- In Vugen Recording toolbar, Click “Stop” (3rd from left) menu item
- In Vugen, select File, click Save As and save the script under folder “D:\StayTuned\Scripts\Recording” with script name as “WebTours_NewRegistration”

| In your system, create the following folder structure D:\StayTuned\Scripts\Recording Or C:\StayTuned\Scripts\Recording |
Click Continue... button - Web Request Function
web_submit_data("login.pl", "Action=http://127.0.0.1:1080/WebTours/login.pl", "Method=POST", "TargetFrame=info", "RecContentType=text/html", "Referer=http://127.0.0.1:1080/WebTours/login.pl?username=&password=&getInfo=true", "Snapshot=t3.inf", "Mode=HTML", ITEMDATA, "Name=username", "Value=staytuned1", ENDITEM, "Name=password", "Value=staytuned1", ENDITEM, "Name=passwordConfirm", "Value=staytuned1", ENDITEM, "Name=firstName", "Value=staytuned1", ENDITEM, "Name=lastName", "Value=staytuned1", ENDITEM, "Name=address1", "Value=staytuned1", ENDITEM, "Name=address2", "Value=staytuned1", ENDITEM, "Name=register.x", "Value=40", ENDITEM, "Name=register.y", "Value=5", ENDITEM, LAST); |
Friday, July 23, 2010
Vugen Recording Options Setup - before recording
Setting up Recording Options


Summary
Setting up environment for script development
Creating shortcuts and Environment Setup for script development
Steps to Create Shortcuts
Vugen
Click Start > All Programs > LoadRunner > Applications >
Move the mouser over “Virtual User Generator “
Right click the mouse, select “Send To” Sub menu and click “Desktop (Create Shorcut)” item.
Repeat the above steps for the components/application such as Analysis and HP Web Tours Application.
Why didn’t I create a shortcut for “Start Web Sever” component?
It is Very simple, I am going to start the server automatically whenever you boot up your system. Otherwise user has to start the server manually every time after starting the system.
How to start web tour web server (“xigui32”) automatically?
Click Start > All Programs > LoadRunner > Samples > Web >
Move the mouser over “Start Web Server“
Right click the mouse and click “copy” item
Click Start > All Programs
Move the mouser over “Startup “
Right click the mouse and click “Open” item
Paste the copied file to this location.
Applications available in this directory will start automatically whenever user boots the system
Desktop screenshot - After creating shortcuts

Loadrunner Post-Installation verification
Steps to verify installed components
Step by step procedure to verify the intended components is installed.
Vugen
Click Start > All Programs > LoadRunner > Applications > Click “Virtual User Generator”
Actual Result
Vugen application is opened
Analysis
Click Start > All Programs > LoadRunner > Applications > Click “Analysis”
Actual Result
Analysis application is opened
Documentation
Click Start > All Programs > LoadRunner > Documentation > Click the requirement document (e.g. Click “VuGen User Guide” for reading vuser related information.
Actual Result
System shall open the clicked document.
Access Sample Application
Click Start > All Programs > LoadRunner > Samples > Web > Click “HP Web Tours Application”
Actual Result
System throws the error as “Page cannot be displayed” error.
Why this error shows up? Didn’t I install sample application?
Explanation
User should start the web server before accessing the application.
Fine, how to start the web server for my sample application?
Click Start > All Programs > LoadRunner > Samples > Web > Click “Start web Server”
After you start the web server, access the application
Click Start > All Programs > LoadRunner > Samples > Web > Click “HP Web Tours Application”
Summary
The installed components such as Virtual User Generator, Analysis, Documentation and Sample application is available on the system.
Thursday, July 22, 2010
Download Loadrunner 9.52 SP2 Patch
STEPS TO DOWNLOAD LOADRUNNER 9.52 PATCH
- http://support.openview.hp.com/downloads.jsp
- Click >>Self-solve tab
- Enter your userid and password
- Click Sign-in>> button
- Select Loadrunner from product listbox
- Select 9.51 from Product Version Listbox
- Select windows from operating system Listbox
- Check "Patches" checkbox and uncheck all other checkboxes
- Click Search button
- Click the link "LoadRunner 9.52 patch" from the results section (LR_03012)
- Click download patch link from "Should I Download" section.
- Click save button and save it to your local disk
Pre-requisite
1.User should have registered with HP Passport and the Service Agreement ID (SAID) should have associated with HP Passport account


Wednesday, July 21, 2010
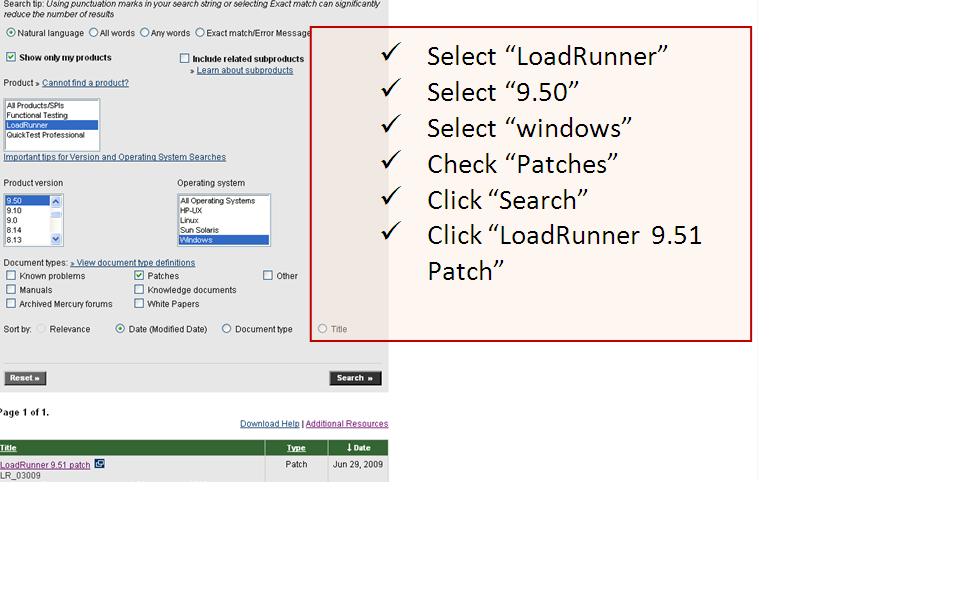
Download Loadrunner 9.51 SP1 Patch
STEPS TO DOWNLOAD LOADRUNNER 9.51 PATCH
- http://support.openview.hp.com/downloads.jsp
- Click >>Self-solve tab
- Enter your userid and password
- Click Sign-in>> button
- Select Loadrunner from product listbox
- Select 9.50 from Product Version Listbox
- Select windows from operating system Listbox
- Check "Patches" checkbox and uncheck all other checkboxes
- Click Search button
- Click the link "LoadRunner 9.51 patch" from the results section (LR_03009)
- Click download patch link from "Should I Download" section.
- Click save button and save it to your local disk
Pre-requisite
1.User should have registered with HP Passport and the Service Agreement ID (SAID) should have associated with HP Passport account
Tuesday, July 20, 2010
Steps to install virtual user generator and other free components of loadrunner
- Extract the file "T7177-15008.zip" using winzip and place the content in the local disk.
- Go to the folder "T7177-15008" and double click "setup"
- Click "LoadRunner Full Setup" Link
- Click "Next" in Loadrunner 9.50 Setup Wizard
- Choose "I Agree" radio button and Click "Next"
- Enter your name and organization name and Click "Next"
- ***** Choose "Custom" radio button and Click "Next" ********* (This is very important step, so select the option carefully)
- Click "down arrow" for "Controller" and Click "Entire feature will be unavailable" option
- Repeat the above steps for the following components (This features are not installed)
ERP and CRM Mediator,Launcher,MI Listener Component and Monitors over FireWall
- Click "down arrow" for "Vuser Generator" and Click "Will be installed on local drive" option
- Repeat the above steps for the following components ((These features are installed)
Analysis, Load Generator,Online Documentation,Samples
- Click "Next" button
- "Select installation folder screen wizard" loads with default installation path "C:\Program Files\HP\LoadRunner\"
- Click Next button
- Click Next button again
- Next button will be disabled until requested components are installed on your system
- Click "Finish" button.
- Click "Exit" button.
we are going to install ONLY components that are NOT require license. The installed components are free to use.we can defer or later install the Controller component (evaluation version) which requires license to use the software. when we install controller,only evaluation version is installed and is available for 10 days for 25 virtual users.
This step assumes that user system has all prerequisite software installed on the system. If prerequisite software is not installed already, the installation wizard opens the screen and displays the list of software that are required. users can install the listed software and further proceed with original installation steps.


GREAT. WE HAVE INSTALLED THE REQUIRED SOFTWARE.In coming days, i am going to write few articles on the following items.
1.How to record the script?
2.How to develop or design the script?
3.How to run the script?
Monday, July 19, 2010
Download Loadrunner 9.5
- Go to URL "https://h10078.www1.hp.com/cda/hpms/display/main/hpms_content.jsp?zn=bto&cp=1-11-126-17%5E8_4000_100__"
- Click "HP LoadRunner 9.5 Evaluation" link
- If you are not registered users, then Register with HP "New Users Register Here" section by entering required fields
- Click "Register" button.
- Click the link "License agreement for HP LoadRunner 9.5 Evaluation".
- Click "I Agree" button. (Please make sure to read the section "Evaluation Software Terms of Use" before clicking I Agree button)
- Click filename "T7177-15008.zip" under link column and download to your local harddisk.
 NOTE
NOTE
The downloaded LR software is for windows operating system. If you are using other operating systems, download the related installable file.
Subscribe to:
Posts (Atom)